IntroductionThis article is a tutorial showing how to create a simple Sip Application with Mobicents, Tomcat and Eclipse. Using JBoss instead of Tomcat should be straightforward.
The procedure is validated under Windows at this time (will be checked under Linux as soon as my Linux PC will be fixed !).
The minimal configuration is winXP, with at least 2GB RAM.
I suppose you are starting from scratch. The main steps are the following :
- Installing Eclipse
- Installing the Tomcat/Mobicents plugin
- Installing Mobicents
- Declaring a server for your Mobicents instance in Eclipse
- Creating a new simple project in Eclipse, and deploy it
- Configure the Mobicents default application router to call your application
- Configure x-lite (softphone)
- Test the application with the x-lite client
In each step, you will find a couple of links, if you need to go further.
Links :
The user guide can be found
here.
Installing EclipseThe required version of Eclipse is 3.4.
Download the package
here (Need the JavaEE distro, to have the Web toolkit installed by default).
Just unzip it somewhere (say c:\eclipse), and run the eclipse.exe.
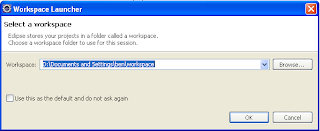
Choose a location for your source (an Eclipse workspace).
Once Eclipse is loaded, display the workbench (right-top icon).
Installing the Tomcat/Mobicents pluginWhat we need at the moment is the
Sip Servlet Core plugin.
- Click Help / Install new software
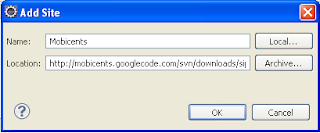
- Click Add
 Name = Mobicents
Location = http://mobicents.googlecode.com/svn/downloads/sip-servlets-eclipse-update-site/
- Select Sip Servlets core plugin
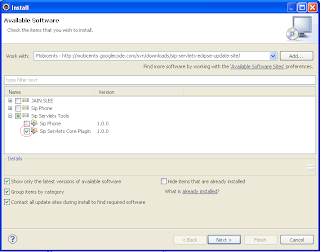
- Click Next a couple of time. Accept the Licence (which is LGPL), confirm that you are OK to install unsigned software, restart Eclipse. Pretty straightforward...
Testing
Once Eclipse is restarted :
Click File / New / Dynamic Web Project.
In the "Configuration" dropdown list, you should have the item "Converged Sip/Web Project".
 LinksVladimir's blogVideo
 showing plugin's insallation (for Eclipse 3.4).
Installing Mobicents
The installation is well described in the
Mobicents user guide.
Install the Tomcat version, which is smaller than the JBoss one and is enough to start.
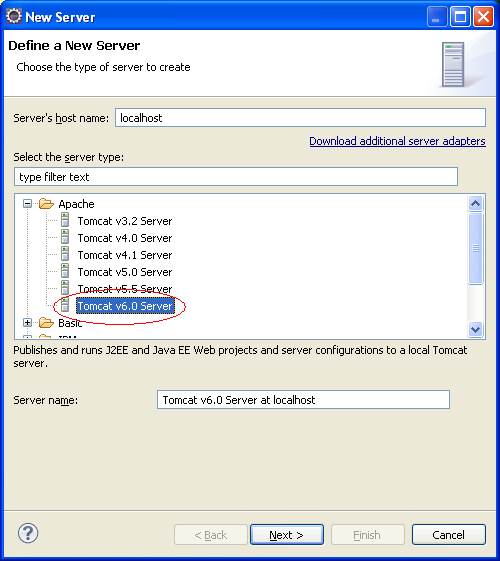
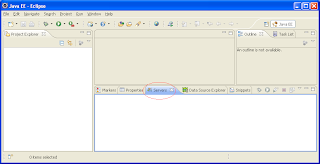
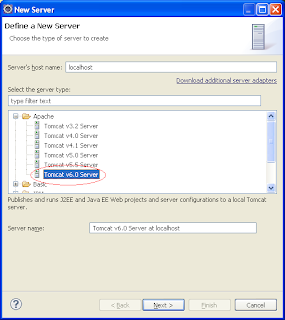
Declaring a server for your Mobicents instance in Eclipse- Open the Servers view (if you can't see it, click Window / Show view / Servers)
- In the Servers pane, right click. Choose new / server
- In the dialog, select Apache Tomcat 6
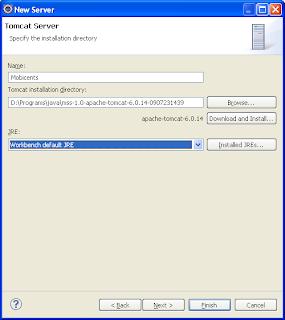
- Select a name for your server, as well as the location (root directory) of your Mobicents Installation ("Tomcat Installation Directory").
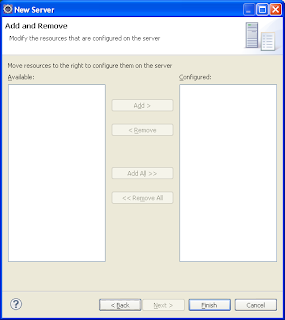
- The next dialog is empty at this time, because we still do not have created any project. Simply click Finish.
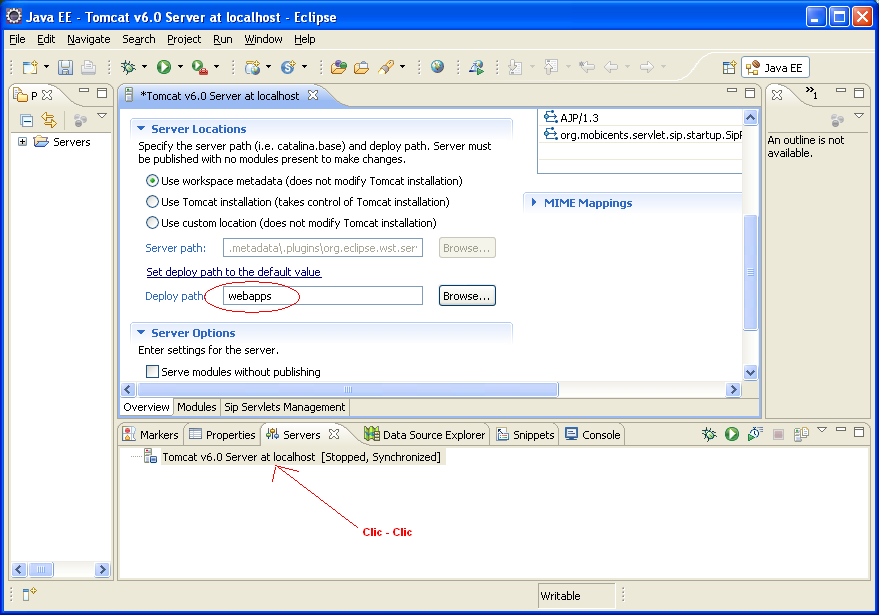
- In the "Servers" pane, double click on your server. Modify the deploy path from "wtpwebapps" to "webapps".
[ If anybody knows how to make Mobicents work with wtpwebapps as deployment directory, let me know !]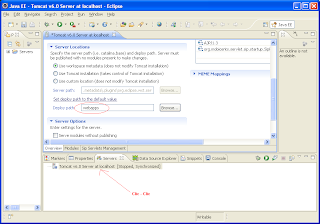
- Save the server's configuration (CTRL + S).
Creating a new simple project in Eclipse- Click File / New / Dynamic Web Project
We will generate a simple SIP application without any Web support (only basic JSP).
- enter "SimpleServlet" as project name.
- select 2.4 as module version (2.5 version does not allow simple SIP app)
- Select "Converged SIP / Web" as configuration

- Click "Finish". This will generate a simple project.
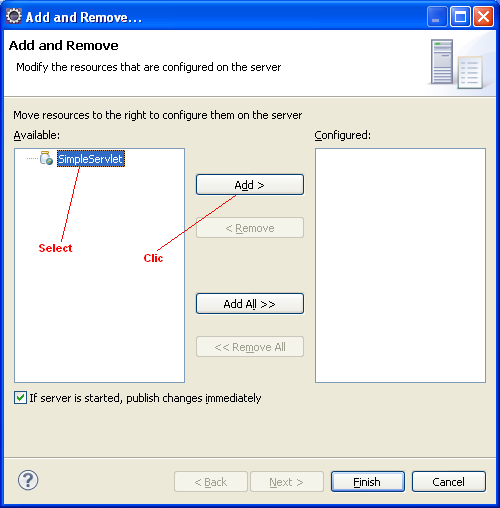
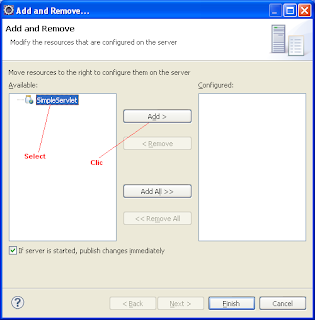
- Right click on your server in the "servers" pane, then select "Add and Remove".
- In the dialog, select "SimpleServlet" on the left side, and make it available ("Add" button). Click "Finish".
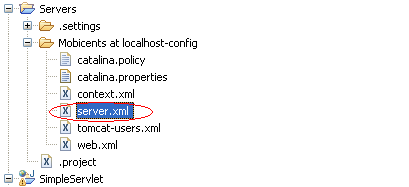
- Open the file Servers / Mobicents at localhost-config / server.xml
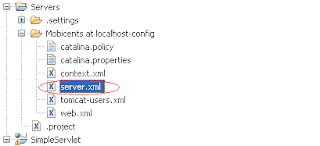
- At the end of the file, locate the Context definition :
<context docbase="SimpleServlet" path="/SimpleServlet" reloadable="true" source="org.eclipse.jst.j2ee.server:SimpleServlet"></host>
- Remove the Context tag. KEEP </host> the tag only !!
Guru's help needed : if you do not remove the context definition from server.xml, Sip servlets are not started at launch time.......- Edit the SimpleServlet.java file (the core of your servlet) :
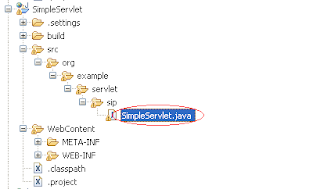
Cut-n'paste the following content (replace all) :
package org.example.servlet.sip;
import java.io.IOException;
import javax.servlet.ServletConfig;
import javax.servlet.ServletException;
import javax.servlet.sip.SipServlet;
import javax.servlet.sip.SipServletRequest;
import javax.servlet.sip.SipServletResponse;
public class SimpleServlet extends SipServlet {
public void doInvite(SipServletRequest request) {
System.out.println("*** Received INVITE ***");
try {
request.createResponse(SipServletResponse.SC_RINGING).send();
//request.createResponse(SipServletResponse.SC_OK).send();
} catch (IOException e) {
e.printStackTrace();
}
}
public void doCancel(SipServletRequest request) {
System.out.println("*** Received CANCEL ***");
try {
request.createResponse(SipServletResponse.SC_REQUEST_TERMINATED).send();
} catch (IOException e) {
e.printStackTrace();
}
}
@Override
public void init(ServletConfig servletConfig) throws ServletException {
System.out.println("****** the simple sip servlet has been started ********* ");
super.init(servletConfig);
}
}
- Deploy your application : in the servers pane, right clic on your server, then deploy.
- Now start the server. On the servers pane, right click on your server, then choose Deploy, and Start
- Check the log file ("console" view). Check that you do not have any error (no excpetion).
- You should see the log ****** the simple sip servlet has been started *********
- Now, the server should be listening on the UDP port 5080 (can be checked by the netstat -an command). It should contain the following line. (if you want grep, I recommand you install MINGW to get grep and tail).
UDP 127.0.0.1:5080 *:*- Your application is deployed in the following directory :
\.metadata\.plugins\org.eclipse.wst.server.core\tmp0\webapps(useful to know to debug sometimes).
- Now, your application is running. We still need to tell Mobicents to route the SIP requests to your application
Configure the Mobicents default application router to call your application- In your Mobicents installation (e.g. c:\Mobicents), edit the following file :
conf\dars\mobicents-dar.properties- Replace the content by the following :
INVITE=("SimpleServlet", "DAR\:From", "TERMINATING", "", "NO_ROUTE", "0")The application "Sip Servlet Management" allows to modify this directly from your browser (avoids typos). Will be explained in a next version.- Restart Mobicents from Eclipse (servers pane, right clic, Stop + Start).
Stopping server hangs under Eclipse. After a few seconds, a dialog box requests you to terminate the server. Any help from a guru is welcome !Configure x-lite
- Download and install x-lite from Counterpath .
- From the menu (arrow on the top), select "Sip account settings", then Add
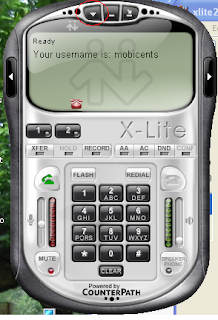
- In the dialog, enter the following :
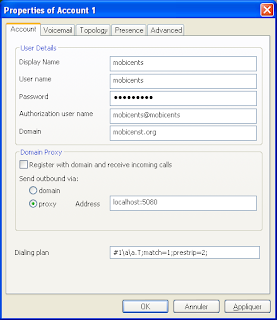
- Display name = mobicents
- User name = mobicents
- Password = mobicents
- Auth user name = mobicents@mobicents
- Domain = mobicents.org
- Important : uncheck "register with proxy"
- proxy = localhost:5080
- Click OK and Close. After a few seconds, x-lite should become "Ready".
- Now, the first "call". Dial 1234 (or whatever). This should call the "doInvite" method of your servlet, which will send a 180 response. You whould then hear the ringback tone in x-lite.
- In the Eclipse console view, check the log :
*** Received INVITE ***
- Click the Hangup button. x-lite will send a Cancel to Mobicents, which will be processed by your app (doCancel method). Mobicents will send a 487 response, making x-lite cleanly terminate the call.
- In the Eclipse console view, check the log :
*** Received CANCEL *** Now, you're ready to start developping a real app !
Good luck and see you later.
Ben


 "-Djavax.servlet.sip.ar.spi.SipApplicationRouterProvider=org.example.servlet.sip.ApplicationRouterProvider"